In this article, I will provide you with a step-by-step guide to creating a Todo List using HTML, CSS, and JavaScript.
Our easy-to-follow tutorial will teach you how to build your very own customized to-do list using HTML, CSS, and JavaScript. This efficient and structured method will enable you to stay on top of your tasks and boost your productivity.
Prerequisites
Before we start coding, ensure you have the following:
- Basic understanding of HTML, CSS, and JavaScript.
- Text editor (e.g., Visual Studio Code, Sublime Text).
- Web browser (e.g., Google Chrome, Mozilla Firefox).
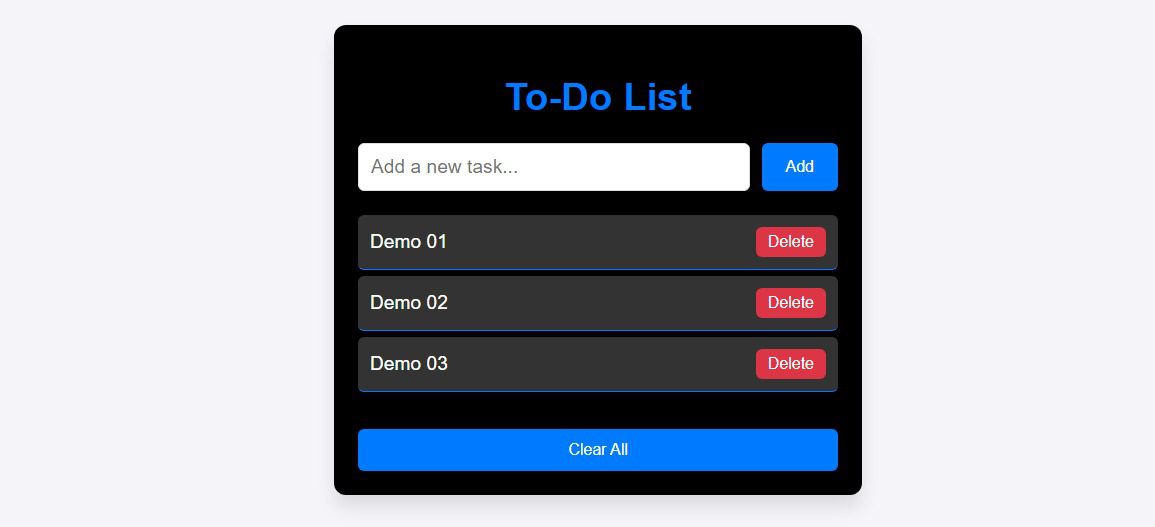
Step 1: HTML structure
First, let’s start with the basic structure of our to-do list. We will use a simple unordered list <ul> to display our tasks and checkboxes <input> to mark them as completed. We will also add some CSS styling to make it more visually appealing.
					<!DOCTYPE html>
<html lang="en">
<head>
    <meta charset="UTF-8">
    <meta name="viewport" content="width=device-width, initial-scale=1.0">
    <title>Responsive To-Do List</title>
    <link rel="stylesheet" href="style.css">
    <title>To-Do Code</title>
<style id="wpr-lazyload-bg-container"></style><style id="wpr-lazyload-bg-exclusion"></style>
<noscript>
<style id="wpr-lazyload-bg-nostyle">.elementor-1911 .elementor-element.elementor-element-2e43d051::before, .elementor-1911 .elementor-element.elementor-element-2e43d051 > .elementor-background-video-container::before, .elementor-1911 .elementor-element.elementor-element-2e43d051 > .e-con-inner > .elementor-background-video-container::before, .elementor-1911 .elementor-element.elementor-element-2e43d051 > .elementor-background-slideshow::before, .elementor-1911 .elementor-element.elementor-element-2e43d051 > .e-con-inner > .elementor-background-slideshow::before, .elementor-1911 .elementor-element.elementor-element-2e43d051 > .elementor-motion-effects-container > .elementor-motion-effects-layer::before{--wpr-bg-d7fea77e-d4c5-46db-a8ef-8f5140363947: url('https://notarena.com/wp-content/uploads/2024/10/BG.png');}.lazyloading{--wpr-bg-e0c9c719-8f1e-4eab-92ec-684bd3cdc8a4: url('https://notarena.com/wp-content/plugins/wp-smushit/app/assets/images/smush-placeholder.png');}</style>
</noscript>
<script type="application/javascript">const rocket_pairs = [{"selector":".elementor-1911 .elementor-element.elementor-element-2e43d051, .elementor-1911 .elementor-element.elementor-element-2e43d051 > .elementor-background-video-container, .elementor-1911 .elementor-element.elementor-element-2e43d051 > .e-con-inner > .elementor-background-video-container, .elementor-1911 .elementor-element.elementor-element-2e43d051 > .elementor-background-slideshow, .elementor-1911 .elementor-element.elementor-element-2e43d051 > .e-con-inner > .elementor-background-slideshow, .elementor-1911 .elementor-element.elementor-element-2e43d051 > .elementor-motion-effects-container > .elementor-motion-effects-layer","style":".elementor-1911 .elementor-element.elementor-element-2e43d051::before, .elementor-1911 .elementor-element.elementor-element-2e43d051 > .elementor-background-video-container::before, .elementor-1911 .elementor-element.elementor-element-2e43d051 > .e-con-inner > .elementor-background-video-container::before, .elementor-1911 .elementor-element.elementor-element-2e43d051 > .elementor-background-slideshow::before, .elementor-1911 .elementor-element.elementor-element-2e43d051 > .e-con-inner > .elementor-background-slideshow::before, .elementor-1911 .elementor-element.elementor-element-2e43d051 > .elementor-motion-effects-container > .elementor-motion-effects-layer::before{--wpr-bg-d7fea77e-d4c5-46db-a8ef-8f5140363947: url('https:\/\/notarena.com\/wp-content\/uploads\/2024\/10\/BG.png');}","hash":"d7fea77e-d4c5-46db-a8ef-8f5140363947","url":"https:\/\/notarena.com\/wp-content\/uploads\/2024\/10\/BG.png"},{"selector":".lazyloading","style":".lazyloading{--wpr-bg-e0c9c719-8f1e-4eab-92ec-684bd3cdc8a4: url('https:\/\/notarena.com\/wp-content\/plugins\/wp-smushit\/app\/assets\/images\/smush-placeholder.png');}","hash":"e0c9c719-8f1e-4eab-92ec-684bd3cdc8a4","url":"https:\/\/notarena.com\/wp-content\/plugins\/wp-smushit\/app\/assets\/images\/smush-placeholder.png"}]; const rocket_excluded_pairs = [];</script></head>
<body>
    <div class="todo-container">
        <h1>To-Do List</h1>
        <div class="input-container">
            <input type="text" id="todo-input" placeholder="Add a new task...">
            <button id="add-btn">Add</button>
        </div>
        <ul id="todo-list"></ul>
        <!-- Clear All Button -->
        <button id="clear-btn">Clear All</button>
    </div>

    <script src="script.js" data-rocket-defer defer></script>
<script>var rocket_beacon_data = {"ajax_url":"https:\/\/notarena.com\/wp-admin\/admin-ajax.php","nonce":"151665f498","url":"https:\/\/notarena.com\/code-library\/how-to-create-a-todo-list-using-html-css-and-javascript","is_mobile":false,"width_threshold":1600,"height_threshold":700,"delay":500,"debug":null,"status":{"atf":true,"lrc":true},"elements":"img, video, picture, p, main, div, li, svg, section, header, span","lrc_threshold":1800}</script><script data-name="wpr-wpr-beacon" src='http://notarena.com/wp-content/plugins/wp-rocket/assets/js/wpr-beacon.min.js' async></script></body>
</html>
Step 2: Adding CSS For Styling
Below is a detailed description of the key CSS styles used to enhance the design of your To-Do List.
					/* General body styling */
body {
    font-family: 'Arial', sans-serif;
    display: flex;
    justify-content: center;
    align-items: center;
    min-height: 100vh;
    margin: 0;
    background-color: #f4f4f9;
}

/* Container for the To-Do List */
.todo-container {
    background: black;
    box-shadow: 0px 10px 15px rgba(0, 0, 0, 0.1);
    padding: 20px;
    border-radius: 10px;
    width: 100%;
    max-width: 400px;
    text-align: center;
    color: white;
}

/* To-do list title */
h1 {
    font-size: 2rem;
    color: #007bff; /* Blue color for the title */
    margin-bottom: 20px;
}

/* Input container and styling */
.input-container {
    display: flex;
    justify-content: space-between;
    margin-bottom: 20px;
}

#todo-input {
    flex: 1;
    padding: 10px;
    border-radius: 5px;
    border: 1px solid #ddd;
    font-size: 16px;
}

#add-btn {
    margin-left: 10px;
    padding: 10px 20px;
    background-color: #007bff; /* Blue button */
    border: none;
    border-radius: 5px;
    color: white;
    cursor: pointer;
    transition: background-color 0.3s ease;
}

#add-btn:hover {
    background-color: #0056b3;
}

/* List styling */
ul {
    list-style-type: none;
    padding: 0;
}

li {
    background-color: #333;
    padding: 10px;
    border-bottom: 1px solid #007bff; /* Blue border */
    display: flex;
    justify-content: space-between;
    align-items: center;
    animation: fadeIn 0.3s ease-in-out;
    border-radius: 5px;
    margin-bottom: 5px;
}

li.completed {
    text-decoration: line-through;
    opacity: 0.6;
}

button.delete-btn {
    background-color: #dc3545;
    border: none;
    padding: 5px 10px;
    color: white;
    border-radius: 5px;
    cursor: pointer;
    transition: background-color 0.3s ease;
}

button.delete-btn:hover {
    background-color: #c82333;
}

/* Clear All button styling */
#clear-btn {
    width: 100%;
    padding: 10px;
    background-color: #007bff; /* Blue button */
    border: none;
    border-radius: 5px;
    color: white;
    cursor: pointer;
    margin-top: 15px;
    transition: background-color 0.3s ease;
}

#clear-btn:hover {
    background-color: #0056b3;
}

/* Keyframe for fade-in animation */
@keyframes fadeIn {
    from {
        opacity: 0;
        transform: translateY(-10px);
    }
    to {
        opacity: 1;
        transform: translateY(0);
    }
}

/* Responsive styling */
@media (max-width: 768px) {
    .todo-container {
        max-width: 95%;
    }

    h1 {
        font-size: 1.5rem;
    }
}
Step 3: Adding JavaScript functionality
Next, we will incorporate JavaScript to bring our to-do list to life. Using event listeners, we will allow users to add tasks, mark them as completed, and delete them from the list.
					// Select necessary DOM elements
const input = document.getElementById("todo-input");
const addBtn = document.getElementById("add-btn");
const todoList = document.getElementById("todo-list");
const clearBtn = document.getElementById("clear-btn");

// Function to create a new task
function addTodo() {
    const taskText = input.value.trim();
    if (taskText === "") return;

    // Create a new <li> element
    const newTask = document.createElement("li");
    newTask.innerHTML = `${taskText} <button class="delete-btn">Delete</button>`;

    // Add task to the list
    todoList.appendChild(newTask);

    // Clear the input field
    input.value = "";

    // Add event listener to mark task as complete when clicked
    newTask.addEventListener("click", function () {
        this.classList.toggle("completed");
    });

    // Add event listener to the delete button
    const deleteBtn = newTask.querySelector(".delete-btn");
    deleteBtn.addEventListener("click", function (e) {
        e.stopPropagation();
        newTask.remove();
    });
}

// Add event listener for "Add" button click
addBtn.addEventListener("click", addTodo);

// Add event listener for pressing "Enter" key to add a task
input.addEventListener("keypress", function (e) {
    if (e.key === "Enter") {
        addTodo();
    }
});

// Function to clear all tasks
clearBtn.addEventListener("click", function () {
    todoList.innerHTML = "";
});
Personalizing your todo list
Not only is our to-do list functional but it can also be customized to suit your preferences. You can add colours, change font styles, and even add personal notes for each task.
Fade-in animation for tasks:
- Defined in CSS with
@keyframes fadeInwhich makes tasks appear smoothly.
Deleting a task:
- The
delete-btnbutton is dynamically added within each task and is used to delete the task by callingnewTask.remove().
esponsiveness:
- The CSS
@media (max-width: 768px)adjusts the width of the todo container and font size for smaller screens.
Polish and Final Touches
To make our to-do list stand out, we will add some finishing touches, such as animations and transitions, to make it more interactive and engaging. We will also include helpful tips and tricks for organizing your tasks efficiently.
In just a few simple steps, you can have your personalized to-do list that will help you stay organized, focused, and on top of your tasks.
- Like
- Digg
- Del
- Tumblr
- VKontakte
-
- Buffer
- Love This
- Odnoklassniki
-
- Meneame
- Blogger
- Amazon
- Yahoo Mail
- Gmail
- AOL
- Newsvine
- HackerNews
- Evernote
- MySpace
- Mail.ru
- Viadeo
- Line
- Comments
- Yummly
- SMS
- Viber
-
- Subscribe
- Skype
- Facebook Messenger
- Kakao
- LiveJournal
- Yammer
- Edgar
- Fintel
- Mix
- Instapaper
- Copy Link

