In this article, we will learn how to create a simple JavaScript calculator using HTML, CSS, and JavaScript.
This calculator will be able to perform basic mathematical operations such as addition, subtraction, multiplication, and division.

To begin, we will create the basic structure of our calculator using HTML. We will use a form element with a ” calculator ” class to contain our calculator. Inside the form, we will have various input fields for the user to enter numbers and operators, and a “result” field to display the calculation result.

HTML Structure
Starting Simple HTML Layout for Building a Basic Calculator
					<body>
  <div class="calculator-container">
    <div class="calculator">
      <div class="result-display" id="result-display"></div> <!-- For showing result -->
      <input type="text" class="display" id="display" disabled />
      <div class="buttons">
        <button class="btn" onclick="clearDisplay()">C</button>
        <button class="btn" onclick="deleteDigit()">DEL</button>
        <button class="btn" onclick="appendOperator('%')">%</button>
        <button class="btn" onclick="appendOperator('/')">/</button>
        <button class="btn" onclick="appendNumber(7)">7</button>
        <button class="btn" onclick="appendNumber(8)">8</button>
        <button class="btn" onclick="appendNumber(9)">9</button>
        <button class="btn" onclick="appendOperator('*')">×</button>
        <button class="btn" onclick="appendNumber(4)">4</button>
        <button class="btn" onclick="appendNumber(5)">5</button>
        <button class="btn" onclick="appendNumber(6)">6</button>
        <button class="btn" onclick="appendOperator('-')">-</button>
        <button class="btn" onclick="appendNumber(1)">1</button>
        <button class="btn" onclick="appendNumber(2)">2</button>
        <button class="btn" onclick="appendNumber(3)">3</button>
        <button class="btn" onclick="appendOperator('+')">+</button>
        <button class="btn zero-btn" onclick="appendNumber(0)">0</button>
        <button class="btn" onclick="appendOperator('.')">.</button>
        <button class="btn equal-btn" onclick="calculateResult()">=</button>
      </div>
    </div>
  </div>
  <script src="assets/js/index.js" data-rocket-defer defer></script>
</body>
HTML Structure in this structure It includes:
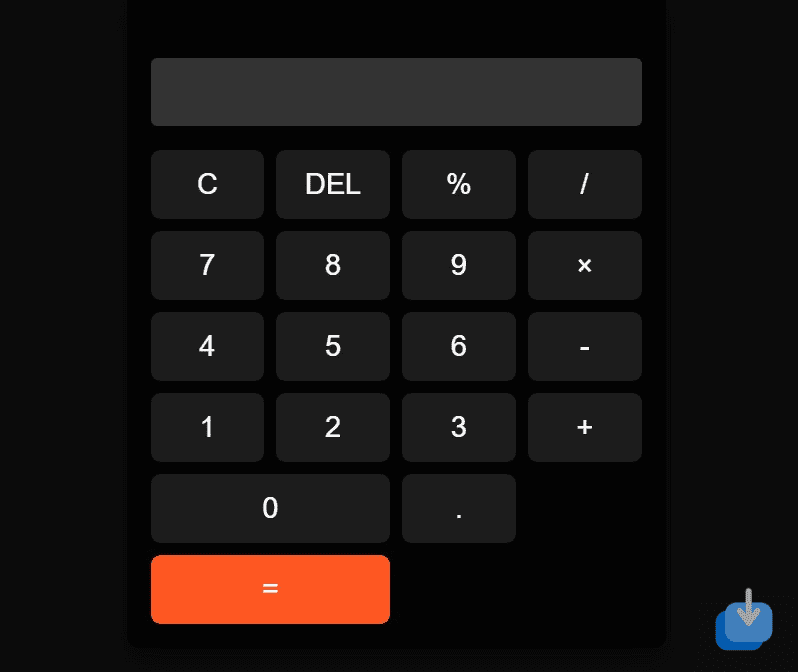
- Result Display: A div (<div id=”result-display”></div>) at the top of the calculator to show the calculation history, such as 2 + 4 = 6.
- Main Display: An <input> field that shows the current input or result. This is where the user sees the numbers and operations they input, or the result after pressing =.
- Buttons: A collection of buttons representing digits (0-9), operators (+, -, *, /), and other actions (clear, delete, equal).
Styling with CSS
Next, we will use CSS to style our calculator and make it look more like a traditional calculator. We can use CSS to give our calculator buttons a sleek appearance and adjust the layout to make it more user-friendly.
Now, let’s bring our calculator to life with CSS. Here’s the CSS code for Calculator:
    * {
  margin: 0;
  padding: 0;
  box-sizing: border-box;
}

body {
  height: 100vh;
  display: flex;
  justify-content: center;
  align-items: center;
  background-color: #0c0c0c;
}

.calculator-container {
  display: flex;
  justify-content: center;
  align-items: center;
}

.calculator {
  background: rgba(0, 0, 0, 0.7);
  padding: 20px;
  border-radius: 10px;
  backdrop-filter: blur(10px);
  box-shadow: 0 10px 20px rgba(0, 0, 0, 0.5);
}

.result-display {
  height: 30px;
  color: lightgreen;
  font-size: 1.5rem;
  text-align: right;
  margin-bottom: 10px;
}

.display {
  width: 100%;
  background: #333;
  color: white;
  font-size: 2rem;
  border: none;
  padding: 10px;
  margin-bottom: 20px;
  text-align: right;
  border-radius: 5px;
}

.buttons {
  display: grid;
  grid-template-columns: repeat(4, 1fr);
  gap: 10px;
}

.btn {
  padding: 15px;
  background: #1c1c1c;
  color: white;
  border: none;
  border-radius: 8px;
  font-size: 1.5rem;
  cursor: pointer;
  transition: all 0.3s ease;
}

.btn:hover {
  background-color: #333;
  transform: scale(1.1);
}

.equal-btn {
  grid-column: span 2;
  background: #ff5722;
}

.equal-btn:hover {
  background-color: #ff7849;
}

.zero-btn {
  grid-column: span 2;
}
CSS Code in this Styling CSS Code includes:
- Blurred Background: The calculator container uses backdrop-filter: blur(10px) to create a glassy, blurred background effect.
- Button Hover Effect: Buttons change colour and slightly increase in size when hovered over, thanks to the transform: scale(1.1) property, creating a smooth animation.
- Grid Layout for Buttons: The buttons are arranged in a grid layout, making it easy to create the calculator’s keypad.
JavaScript Functionality
Now comes the most crucial part – the JavaScript. We will add event listeners to the buttons, which will be responsible for triggering the appropriate mathematical operation when pressed.
					let lastInput = ''; // Tracks the last input to avoid consecutive operators
let expression = ''; // Stores the current calculation expression
let resultShown = false; // Tracks whether result is shown to allow further calculations

function appendNumber(number) {
  const display = document.getElementById('display');

  if (resultShown) {
    expression = ''; // Reset expression if result is shown
    resultShown = false;
  }

  // Append number to the expression and display it
  expression += number;
  display.value = expression;

  lastInput = number;
}

function appendOperator(operator) {
  const display = document.getElementById('display');

  // Prevent adding operator at the start or consecutively
  if (expression === '' || isOperator(lastInput)) {
    return;
  }

  expression += operator;
  display.value = expression;

  lastInput = operator;
  resultShown = false; // Continue calculations after an operator
}

function clearDisplay() {
  document.getElementById('display').value = '';
  document.getElementById('result-display').innerHTML = '';
  expression = '';
  lastInput = '';
}

function deleteDigit() {
  expression = expression.slice(0, -1); // Remove last character
  document.getElementById('display').value = expression;

  lastInput = expression.slice(-1); // Update lastInput
}

function calculateResult() {
  const display = document.getElementById('display');
  const resultDisplay = document.getElementById('result-display');

  try {
    if (expression && !isOperator(lastInput)) {
      const result = eval(expression); // Calculate result
      resultDisplay.innerHTML = `${expression} = ${result}`; // Show result on top
      display.value = result; // Show result in main display
      expression = result.toString(); // Store the result for further calculations
      resultShown = true;
    }
  } catch {
    display.value = 'Error';
  }
}

function isOperator(char) {
  return ['+', '-', '×', '/'].includes(char);
}
Javascripts Functionality The JavaScript handles all the logic for the calculator, including input handling, operations, and displaying results.
The actual calculations will be performed by creating separate functions for each mathematical operation. These functions will be called inside our event listeners. They will take the user-entered values and use JavaScript’s built-in mathematical operators to perform the calculation. The result will then be displayed in the result field.
Once the calculator is fully functional, we can add error handling to prevent users from inputting invalid characters or dividing by zero. We can also incorporate additional features such as a backspace button to delete a single character and a decimal button to allow for decimal calculations.
Key Function
Each button has an onclick attribute that triggers a JavaScript function when clicked. For example:
<button class="btn" onclick="appendOperator('*')">*</button>
appendNumber(number): This function is triggered when a number button is pressed. It appends the number to the current expression and displays it on the main screen.
					function appendNumber(number) {
  expression += number;  // Add the number to the current expression
  display.value = expression;  // Show the updated expression in the display
}
appendOperator(operator): This function appends an operator (+, -, *, /) to the expression. It ensures that two operators cannot be added consecutively (e.g., 3 + + is invalid).
					function appendOperator(operator) {
  if (expression === '' || isOperator(lastInput)) {
    return;  // Prevent adding an operator at the start or consecutively
  }
  expression += operator;  // Add the operator
  display.value = expression;  // Show the expression in the display
}
Explanation of the Calculator Code
The Calculator operates in the following steps:
- Number Input: When a number button is clicked, it is added to the current expression. For example, pressing 2 will add 2 to the expression.
- Operator Input: Clicking on an operator button (+, -, *, /) adds the operator to the expression. For example, pressing * after 2 will change the expression to 2*.
- Result Calculation: Pressing = evaluates the entire expression and displays the result.
- Sequential Operations: After displaying the result, the user can continue calculating by using the result in new operations. For example, after evaluating 2*3 = 6, the user can then press +4 and get the result of 10.
For instance: Entering 7 * 3, pressing = will display the result 21. Then, entering + 10 will update the expression to 21 + 10. Pressing = once again will display the result 31.
creating a JavaScript calculator using HTML, CSS, and JavaScript is a straightforward and fun project. It is a great way to practice your skills and understand the basics of DOM manipulation, event handling, and error handling in JavaScript.
- Like
- Digg
- Del
- Tumblr
- VKontakte
-
- Buffer
- Love This
- Odnoklassniki
-
- Meneame
- Blogger
- Amazon
- Yahoo Mail
- Gmail
- AOL
- Newsvine
- HackerNews
- Evernote
- MySpace
- Mail.ru
- Viadeo
- Line
- Comments
- Yummly
- SMS
- Viber
-
- Subscribe
- Skype
- Facebook Messenger
- Kakao
- LiveJournal
- Yammer
- Edgar
- Fintel
- Mix
- Instapaper
- Copy Link


